Piano Vision
In an effort to focus more of my attention on coding, I managed to pick up two computer science papers at the start of the year to add to my mechanical engineering degree. One of these was computer vision.
My only previous experience with computer vision merged my interest in programming with my interest in music. This previous project, named “VMIDI”, used an RGB camera to track markers attached to the action of a partially-dismantled piano. The code utilised Python and OpenCV to track keypresses and their velocities. While a good learning opportunity, VMIDI was slow, intrusive and never made it very far.
When I discovered students could specify our own projects in the computer vision course, making the sequel to VMIDI seemed like a natural evolution of my previous line of thought. So I decided to give VMIDI2 a go, this time armed with one year more coding experience and departmental backing.
There was a third difference between VMIDI and VMIDI2: the C++ language. Using C++ for VMIDI2 ended up being a bit of a revelation. While Python computer vision can be fast if native OpenCV calls are maximised, C++ makes speed seem effortless. The source code for VMIDI2 is available on GitHub.
The rest of this article is a compressed version of the research paper I wrote on this topic.
Method
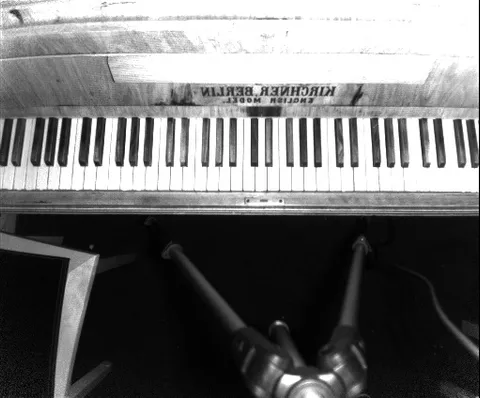
The Kinect camera is positioned above the keyboard, as shown by this IR frame:
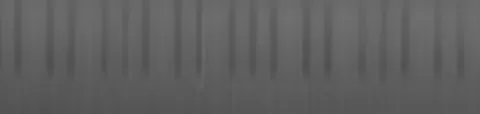
The keyboard is extracted from the depth frame (not pictured) using perspective warp on manually-selected points. After applying a bilateral filter to remove some noise, the following frame is obtained:
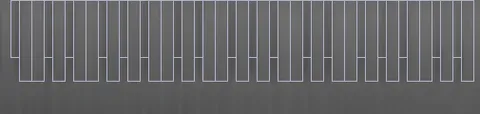
Keys are manually overlaid over this image. These rectangles will be used as key masks for key depth tracking in a future step.
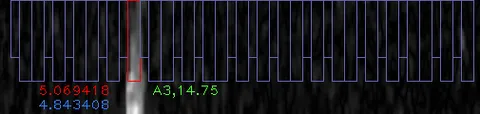
This unpressed state is used to create a difference image for successive frames. Each pixel in this difference image has a value of millimetres below its initial, unpressed state. When unpressed, it looks like this:
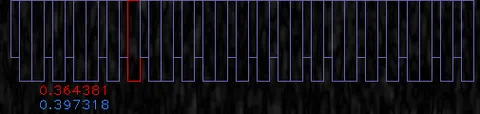
It’s basically black, because the keyboard is essentially still in its initial state. Each key’s rectangle is used as a mask within which the mean pixel value is calculated (shown in red for the A3 key). Each mean value is assigned to its key. Additionally assigned is an n=5 rolling average of this value (shown in blue).
When pressed, the depth reflects the change:
We’ll get to the velocity value (shown in green) later, but first there is an important consideration to make when tracking keypresses. Often hands cover unpressed keys while playing. It is important to exclude from the difference image any pixels belonging to hands. To achieve this, I made a simple hand detection procedure. Pixels a certain distance above the keyboard are thresholded:
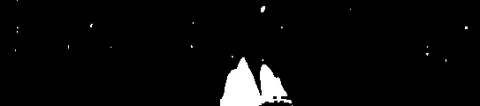
These pixels include hands and a smattering of noise. To remove the noise, an image opening step was applied. A further dilation made the hand area more conservative, in an attempt to approximately cover parts of fingers near the key level.

Finally, this mask was subtracted from the key mask before finding average depths. Here’s an example of such a combined mask. It can be seen the subtraction of the hand frame has taken a ‘nibble’ out of the otherwise rectangular key mask.

Each key depth mean obtained from these masks is tracked and used to generate a rolling average. When this average exceeds the press depth required for the key to sound (measured at about 4.5mm on my piano), the reverse difference method is used to work out how quickly the key was going when it reached sounding point. The following graph shows how this occurs. A gradient is calculated using the points straddling the point of sound line.

Results
Various keys were pressed multiple times with varying volumes. Using a microphone recording and Adobe Audition, the peak amplitude of each keypress was extracted from an audio recording. These amplitude values were used as a baseline to which the calculated press velocities were compared. Plotting calculated keypress velocity against measured audio levels yielded the following graph:

Which is great! Lines were matched with R2 values ranging from 0.81 to 0.92.
Future Research and Improvements
- Some full-on performance analysis. VMIDI2’s results were based on repeated keypresses. This makes sense for testing a proof of concept, however it made comparison with previous research difficult. The prior research which I could turn up generally neglected velocity sensitivity but had quite thorough result gathering.
- Integration with an AMT workflow. A notable piece of prior research by Akbari presented a system for automatic music transcription (AMT). Essentially an RGB camera is pointed at a keyboard, and when a performance occurs, sheet music is generated. This has three phases: keyboard registration, keypress detection and transcription. VMIDI2 as it stands is ‘weak’ in some ways, as it requires manual keyboard registration and does not contain transcription features. It would be great to try to use it as the keypress detection stage in a larger process.
- Investigation into keypress detection robustness. A wide range of keys should be tested and compared to audio amplitudes. Do, say, lower keys make less sound for the same press velocity? Does each keyboard benefit from an individual calibration ‘profile’ of some sort?
- Investigation into camera positioning. Distance is a big one here. One application of VMIDI2 may well be hanging a Kinect sensor over a publicly accessible keyboard. Keeping the sensor well out of reach would be ideal, and it would be worth testing the effect of distance on accuracy. Angle may likewise be useful to test.