How to Automate a Heat Pump Unit
In the previous article I went into the details of reverse-engineering a heat pump remote. We got to the stage were it was possible to send an arbitrary state to the heat pump by constructing IR packets from scratch. I even wrote some code to do the packet construction (view it on GitHub). But how do we make this useful? As a Home Assistant user, I wanted to be able to control the heat pump via Home Assistant. This would open up a world of automation potential as well as Google Assistant and Alexa control.
Automate
From the get-go, I had an idea of how I was going to implement this process. A virtual heat pump entity will be present and state-managed in Home Assistant. Changes to the state of this fake heat pump will get picked up by a Node-RED automation which will construct a packet and sent it to the heat pump via the Home Assistant Broadlink blaster component.
Home Assistant
I needed a simple virtual heat pump entity in Home Assistant. The climate.mqtt entity is perfect for this. It operates optimistically, which means it assumes any commands are applied successfully. As a result the virtual state is updated instantly upon sending a command. Optimistic state management is generally less desirable than proper state feedback, but it’s the best we can do in this case - that’s how the original remote operates, anyway.
A suitable climate entity looks like this:
climate:
  - platform: mqtt
    name: fujitsu
    qos: 2
    availability_topic: virtual/nodered/availability
    min_temp: 16
    max_temp: 30
    temp_step: 1
    modes:
      - 'off'
      - 'auto'
      - 'cool'
      - 'dry'
      - 'fan_only'
      - 'heat'
    fan_modes:
      - 'Auto'
      - 'Quiet'
      - 'Low'
      - 'Med'
      - 'High'
    swing_modes:
      - 'Off'
      - 'Vertical'
      - 'Horizontal'
      - 'Both'
    power_command_topic: 'flat/lounge/heatpump/power/set'
    mode_command_topic: 'flat/lounge/heatpump/mode/set'
    temperature_command_topic: 'flat/lounge/heatpump/temperature/set'
    fan_mode_command_topic: 'flat/lounge/heatpump/fan/set'
    swing_mode_command_topic: 'flat/lounge/heatpump/swing/set'
    current_temperature_topic: 'flat/lounge/temperature/current'
We actually don’t need the MQTT command functionality that this climate entity provides as we’ll just be directly monitoring the state from Node-RED. But I defined topics anyway as it won’t do any harm. The heat pump looks like this on the Home Assistant dashboard:
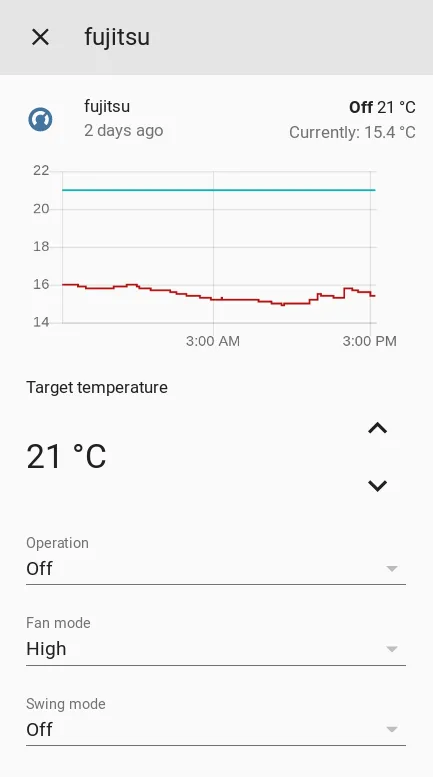
Perfect! You might not have a current temperature readout at this stage, but I’ll address that with a Node-RED automation later in the article. We can play around with the virtual heat pump at this stage. Obviously, the heat pump will not respond as we haven’t developed an automation yet. The state on the virtual heatpump will update, however.
Docker
Before we move on to automating the heat pump, we need to find somewhere for the packet-generating code to live. As a sadistic web developer, I couldn’t pass up the opportunity to wrap the code in a simple web API and put it in a Docker container.
You can totally do this without Docker. The best option would be to organise the code into script (“function”) nodes in Node-RED. JavaScript code is available at the repo. The rest of this article will assume you have the code running in some kind of web API, however.
We just need to build an image and run the container with something like the following:
git clone https://github.com/albertnis/fujitsu-ar-ry13-ir-codes
cd fujitsu-ar-ry13-ir-codes
docker build -t ir-sandbox .
docker run -p 8080:8080 -d ir-sandbox --name="ir-sandbox" --restart="always"
I’ll be adding this to my home automation docker-compose file someday, but for now the manual build and run does the trick! At this stage IR codes can be constructed via the API. For example:
$ curl "http://localhost:8080/broadlink?tempC=18&mode=heat&fanSpeed=Quiet&swing=Off&powerOn=0"
JgAGAWg0DQ0NDQ0mDQ0NJg0NDQ0NDQ0mDSYNDQ0NDQ0NJg0mDQ0NDQ0NDQ0NDQ0NDQ0NDQ0NDQ0NDQ0NDQ0NJg0NDQ0NDQ0NDQ0NDQ0NDSYNDQ0NDQ0NDQ0mDSYNJg0mDSYNJg0mDSYNDQ0NDSYNDQ0NDQ0NDQ0NDQ0NDQ0NDSYNJg0NDQ0NDQ0NDQ0NDQ0NDSYNDQ0NDQ0NDQ0mDQ0NDQ0NDQ0NDQ0NDQ0NJg0NDQ0NDQ0NDQ0NDQ0NDQ0NDQ0NDQ0NDQ0NDQ0NDQ0NDQ0NDQ0NDQ0NDQ0NDQ0NDQ0NDQ0NDQ0NDQ0NDQ0NDQ0NDQ0NDSYNDQ0NDQ0NDQ0NDSYNDQ0NDQ0NJg3/DQUAAA==
Node-RED
Time for the fun part! I made an automation flow which will run every time the virtual heat pump’s state changes. It looks like this:
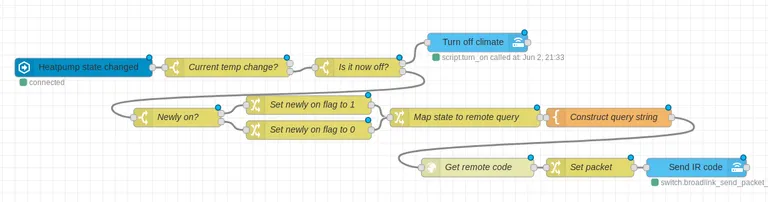
I’ll run through the steps briefly:
-
Heatpump state changed runs whenever something about the heat pump is altered. This includes mere changes to the ambient temperature.
-
Current temp change halts the flow if only the current temperature is changed. We don’t need to send IR commands if the ambient temperature changes in the room. It causes the heat pump to beep all the time which is annoying. We’re only interested in actual command changes.
-
Is it off now? If the heat pump is newly off, a Home Assistant script is run which just broadcasts the stateless off code.
-
Newly on? Sets the relevant parameter depending on whether the heat pump is just turning on or has already been powered up. This parameter matters for construction of the payload for some reason.
-
Map state to remote query just reorganises new state information into a neater structure within the flow message under the
querykey. This step isn’t strictly needed. -
Construct query string is a template node which changes the
queryobject into a string to be passed to our API.?tempC={{query.tempC}}&mode={{query.mode}}&fanSpeed={{query.fanSpeed}}&swing={{query.swing}}&powerOn={{query.powerOn}} -
Get remote code calls the API.
-
Set packet moves the response string into the
msg.payloadkey of the flow message. -
Send IR code is where we close the loop. It invokes the
switch.broadlink_send_packetservice in Home Assistant to send our code to a Broadlink IR blaster entity. The data template looks like this:{ "packet": "{{payload}}" }
There’s just one more automation we need to set up, to get current temperature showing up in the heatpump entity. I don’t have access to the heat pump’s thermostat so I circumvented this by putting a Aqara temperature sensor in the same room. The following automation flow maps any temperature changes of that sensor to the MQTT topic which was set as the current_temperature_topic of our virtual heatpump:

Wrap-up
Time to see this beast in action!
Without a doubt, working on this heat pump has been one of the most satisfying home automation projects I have worked on for a while. From learning about how IR communication really works, to cracking the code of the remote, to wrapping the whole thing in an API - it’s been a great learning experience.